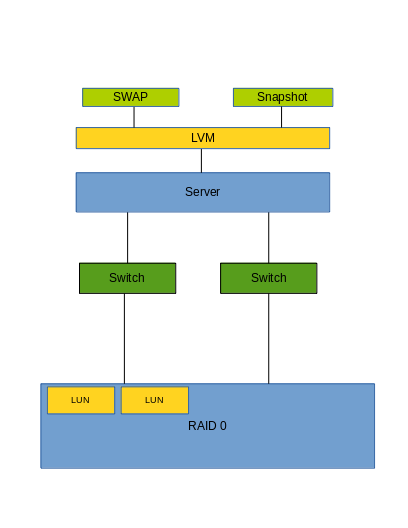
存储涉及好多好多东西,这里把软RAID,iSCSI,Multipath,LVM,SWAP都堆在一起,做个简单的综合实验。
参考文档已经说明的东西,这里就不重复讲述了。
Contents
参考文档
1. 鸟哥的Linxu私房菜-LVM,Storage http://linux.vbird.org/linux_basic/0420quota.php
2. 鸟哥的Linxu私房菜-iSCSI http://linux.vbird.org/linux_server/0460iscsi.php
3. Redhat iSCSI文档 https://access.redhat.com/documentation/en-US/Red_Hat_Enterprise_Linux/6/html/Storage_Administration_Guide/ch-iscsi.html
4. Redhat Multipath文档 https://access.redhat.com/documentation/en-US/Red_Hat_Enterprise_Linux/6/html-single/DM_Multipath/
5. Redhat LVM文档 https://access.redhat.com/documentation/en-US/Red_Hat_Enterprise_Linux/6/html/Logical_Volume_Manager_Administration/
实验内容

1. Server1用作Storage(iSCSI target), Server2用作iSCSI initiator;
2. 在Server1中建立软RAID,在软RAID的基础上划分出两个LUN;
3. 配置Server1 iSCSI target,共享出这两个LUN;
4. Server2用两条链路连接iSCSI target,获得两个multipath设备;
5. 用一个Multipath设备做LVM,建一个LV以及它的Snapshot.
6. 用另一个Multipath设备建LV,格式化为SWAP.
实验环境
1. Server1 和 Server2 的OS是 RHEL6.5;
2. Server1 IP地址:192.168.122.108;192.168.100.108;
3. Server2 IP地址:192.168.122.50;192.168.100.50;
4. Server1 添加四块硬盘 vda,vdb,vdc,vdd;
搭建软RAID
1. 在Server1中添加四块硬盘 vda,vdb,vdc,vdd;
2. mdadm做RAID-0;
[root@server1 ~]# mdadm --create --auto=yes /dev/md0 --raid-devices=2 --level=0 /dev/vd{a,b}
mdadm: Defaulting to version 1.2 metadata
mdadm: array /dev/md0 started.
[root@server1 ~]# mdadm --create --auto=yes /dev/md1 --raid-devices=2 --level=0 /dev/vd{c,d}
mdadm: Defaulting to version 1.2 metadata
mdadm: array /dev/md1 started.
iSCSI Target
(在Server1中)
1. 安装iSCSI Target套件;
# yum install scsi-target-utils
2. 修改/etc/tgt/targets.conf
    backing-store /dev/md0
    backing-store /dev/md1
3. 重启tgtd
[root@server1 ~]# /etc/init.d/tgtd restart
4.添加防火墙规则
在/etc/sysconfig/iptables 中加入
-A INPUT -p tcp -m tcp --dport 3260 -j ACCEPT
重启iptables.
iSCSI Initiator
1.在Server2中,安装iSCSI Initiator套件。
# yum install iscsi-initiator-utils
2. Discover iSCSI设备
[root@server2 ~]# iscsiadm --mode discoverydb --type sendtargets --portal 192.168.122.108 --discover
Starting iscsid:                                           [  OK  ]
192.168.122.108:3260,1 iqn.2008-09.com.example:server.target1
[root@server2 ~]# iscsiadm --mode discoverydb --type sendtargets --portal 192.168.100.108 --discover
192.168.100.108:3260,1 iqn.2008-09.com.example:server.target1
3. Login iSCSI设备
[root@server2 ~]# iscsiadm --mode node --targetname iqn.2008-09.com.example:server.target1 --portal 192.168.122.108:3260 --login
Logging in to [iface: default, target: iqn.2008-09.com.example:server.target1, portal: 192.168.122.108,3260] (multiple)
Login to [iface: default, target: iqn.2008-09.com.example:server.target1, portal: 192.168.122.108,3260] successful.

[root@server2 ~]# iscsiadm --mode node --targetname iqn.2008-09.com.example:server.target1 --portal 192.168.100.108:3260 --login
Logging in to [iface: default, target: iqn.2008-09.com.example:server.target1, portal: 192.168.100.108,3260] (multiple)
Login to [iface: default, target: iqn.2008-09.com.example:server.target1, portal: 192.168.100.108,3260] successful.
Multipath
Server2上安装
[root@server2 ~]# yum install device-mapper-multipath
[root@server2 ~]# mpathconf --enable
重启multipathd
[root@server2 ~]# /etc/init.d/multipathd restart
查看Multipath结果
[root@server2 ~]# ls /dev/mapper/
我这里出现了mpathb mpathc两个设备。
LVM
(在Server2中)
1. 可以对mpathb进行分区:分出5个2G大小的逻辑分区,将id都设置为8e;
2. 也对mpathc进行分区:分出5个2G大小的逻辑分区,将id都设置为8e;
[root@server2 ~]# ls /dev/mapper/
应该能看到mpathbp1 mpathbp6 mpathbp8 mpathc mpathcp5 mpathcp7 mpathcp9 mpathb mpathbp5 mpathbp7 mpathbp9 mpathcp1 mpathcp6 mpathcp8
3. 创建PV,VG
[root@server2 ~]# pvcreate /dev/mapper/mpathbp{5,6,7,8} /dev/mapper/mpathcp{5,6,7,8}
  Physical volume "/dev/mapper/mpathbp5" successfully created
  Physical volume "/dev/mapper/mpathbp6" successfully created
  Physical volume "/dev/mapper/mpathbp7" successfully created
  Physical volume "/dev/mapper/mpathbp8" successfully created
  Physical volume "/dev/mapper/mpathcp5" successfully created
  Physical volume "/dev/mapper/mpathcp6" successfully created
  Physical volume "/dev/mapper/mpathcp7" successfully created
  Physical volume "/dev/mapper/mpathcp8" successfully created
[root@server2 ~]# vgcreate vg1 /dev/mapper/mpathbp{5,6,7,8}
  Volume group "vg1" successfully created
[root@server2 ~]#
[root@server2 ~]# vgcreate vg2 /dev/mapper/mpathcp{5,6,7,8}
  Volume group "vg2" successfully created
SWAP
(在server2上)
1. 在vg1上创建一个5G的LV。
[root@server2 ~]# lvcreate vg1 --size 5G --name lvswap
  Logical volume "lvswap" created
用lvs检查。
2. 创建swap.
[root@server2 ~]# mkswap /dev/vg1/lvswap
3. 挂载swap
[root@server2 ~]# swapon /dev/vg1/lvswap
4.检查swap
[root@server2 ~]# swapon -s
Filename				Type		Size	Used	Priority
/dev/dm-1                               partition	2064376	0	-1
/dev/dm-16                              partition	5242872	0	-2
5.卸载swap
[root@server2 ~]# swapoff /dev/vg1/lvswap
Snapshot
在server2的vg2上,建立一个lv,并建立它的snapshot。
1. 建立lv.
[root@server2 ~]# lvcreate vg2 --name lv1 --size 1G
  Logical volume "lv1" created
2. 建立lv的文件系统
[root@server2 ~]# mkfs.ext4 /dev/vg2/lv1
3. 挂载
[root@server2 ~]# mount /dev/vg2/lv1 /mnt/disk1/
[root@server2 ~]# touch /mnt/disk1/hehe
4. 创建snapshot.
[root@server2 ~]# lvcreate --snapshot --name lv1snap --size 500M /dev/vg2/lv1
  Logical volume "lv1snap" created
5. 挂载lv1snap看看
[root@server2 ~]# mount /dev/vg2/lv1snap /mnt/disk2/
[root@server2 ~]# ls /mnt/disk2/
hehe  lost+found
Troubleshooting
1. iscsi开启启动慢;
删掉/var/lib/iscsi/nodes和/var/lib/send-targets下无用的IP和Target。
2. vg启动的时候inactive;
在fstab中进行自动挂载,options中加上_netdev.
其他笔记
扩展LV空间
1. 如果VG空间不够,插入新硬盘,创建PV;
2. vgextend vg1 /dev/vda ;
3. lvextend -L +20G /dev/vg1/lv1
4. resize2fs /dev/vg1/lv1
Striped LV
The following command creates a striped logical volume across 2 physical volumes with a stripe of 64kB. The logical volume is 50 gigabytes in size, is named gfslv, and is carved out of volume group vg0.
# lvcreate -L 50G -i2 -I64 -n gfslv vg0
xfs
要格式化磁盘为XFS文件系统,需要安装xfsprogs包。
需要配置yum源(路径在RHEL安装光盘的ScalableFileSystem目录下)。
修改/etc/yum.repos.d/iso.repo
[fs]
name=fs
baseurl=file:///mnt/yum/ScalableFileSystem
enabled=1
gpgcheck=0
[root@vserver2 ~]# yum install xfsprogs
删除iscsi nodes
删除/var/lib/iscsi/下对应的nodes和send_targets